HTML pages and scripts customization
HTML templates
You can include some HTML parts in different sections of the layout application.
These templates can be translated by using the language code as a suffix (e.g. homeTop-en.html will be rendered only for the English interface). The application tries to find the localized template first, otherwise it tries the non-localized template, otherwise it displays nothing.
Note
If you want to display a message common to all languages but not to a particular language (e.g. french), just create the template suffixed with its language code (e.g. -fr.html) and leave it empty, and voilà!
See examples in customization file.
Templates available on all pages
customization/html/headerTop.html: before the header sectioncustomization/html/headerBottom.html: after the header section and before the content pagecustomization/html/footerTop.html: before the footer section and after the content pagecustomization/html/footerBottom.html: after the footer section
Templates available on home page
customization/html/homeTop.html: first section of the homepagecustomization/html/homeBottom.html: last section of the homepage
Templates on details page (trek, touristic content, touristic event, outdoor site and outdoor course)
You can create your own templates to display practical information or widgets in different parts of the details page. There are 3 steps to follow:
Step 1: Create a new file suffixed with .html in customization/html/details/ (e.g. example.html) and fill the the content with html tags
You can define variables in "mustache templates" (meaning between brackets {{ variable }}) that will be converted once rendered. For the moment, there are 4 variables available:
- Page ID with
{{ id }} - Content type
{{ type }}: rendered values are "trek", "touristicContent", "touristicEvent", "outdoorSite", "outdoorCourse"). - The code of the (departure) city
{{ cityCode }}: useful for widgets such as forecast. - The language code
{{ language }}The current language of the page.
When choosing a template name, care must be taken not to select a reserved name used by sections defined by the application (e.g presentation, see example).
If you do, the customized template will not be displayed.
Step 2: Copy the template name without the .html suffix into the customization/config/details.json file.
For example I want to display it in treks and outdoor sites details page:
{
  "sections": {
    "trek": [
      {
        "name": "example",
        "display": true,
        "anchor": true,
        "order": 11
      }
    ],
    "outdoorSite": [
      {
        "name": "example",
        "display": true,
        "anchor": true,
        "order": 11
      }
    ]
  }
}
Step 3:. Copy the section title/anchor into the translations files.
For example in customization/translations/en.json:
Widgets examples
You can embed third-party widgets into Geotrek-rando detail pages by adding their HTML code in the appropriate customization.html/details/ subfolder.
The widget can exploit data from the geotrek page to customize the displayed information (departure city, trek geometry, trek name, etc.).
Here is some examples but there is a lot more that can be done, your imagination is your limit !
Weather Forecast (Météo-France)
This widget exists by default in Geotrek-rando
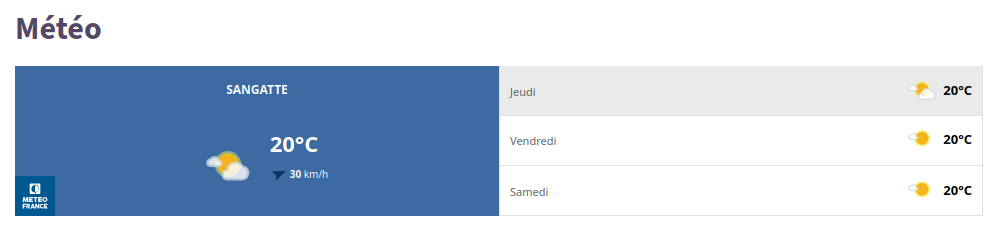
File location:
customization.html/details/forecastWidget.html (see code)
Widget page: Météo-France Widgets
Note
By default the forecast widget is enabled for all content types; if you want to remove it, you need to write it explicitly in the customization/config/details.json file.
{
  "sections": {
    "trek": [
      {
        "name": "forecastWidget",
        "display": false
      }
    ],
    "touristicContent": [
      {
        "name": "forecastWidget",
        "display": false
      }
    ],
    "touristicEvent": [
      {
        "name": "forecastWidget",
        "display": false
      }
    ],
    "outdoorSite": [
      {
        "name": "forecastWidget",
        "display": false
      }
    ],
    "outdoorCourse": [
      {
        "name": "forecastWidget",
        "display": false
      }
    ]
  }
}
Air Quality (Atmo)
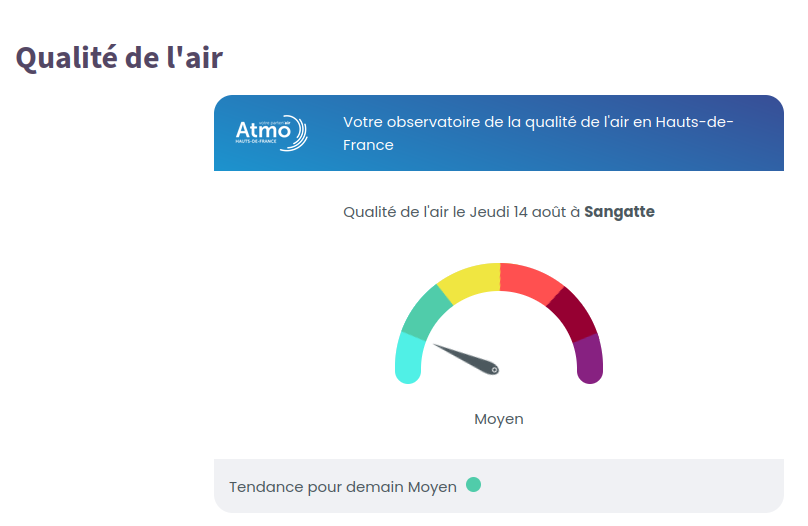
Configuration Check this comment
BAM widget
The BAM widget is an open-source biodiversity widget developed by French National Parks. It can be integrated into Geotrek-rando detail pages to display biodiversity observations around a trek or other touristic content.
When a trek detail page is displayed, the BAM widget retrieves the trek geometry from the Geotrek-admin API as GeoJSON. It then creates a buffer around this geometry (the buffer size in meters is defined in the widget parameters, 100 meters in the example below) and queries a biodiversity data source to retrieve observations within this area. By default, the data source is GBIF, but it can be replaced by a GeoNature instance to generate a list of observed species.
For more information about the widget, please visit the project's GitHub page.
Integration steps
- Copy the widget template below into your Geotrek-rando customization folder, for example:
customization/html/details/BAMwidget.html - In the iframe configuration, replace
https://geotrekdemo.ecrins-parcnational.fr
with the URL of your own Geotrek-admin instance. - Adjust widget parameters if needed (buffer size, filters visibility, display mode, number of species per line, or data source). Refer to the BAM documentation and configurator for the full list of available parameters.
- Declare the widget and its position in the
customization/config/details.jsonfile. Example:
- Add a translated title for the widget block in your custom translations file. Example in
customization/translations/fr.json:
Widget template example
<iframe
  src="https://pnx-si.github.io/BAM-widget/#/?showFilters=false&sourceGeometry=https://geotrekdemo.ecrins-parcnational.fr/api/v2/trek/{{ id }}/?fields=geometry%26format=geojson&buffer=100&connector=gbif&nbTaxonPerLine=4&widgetType=list"
  style="height: 80vh"
  allow="geolocation"
  title="Biodiversité autour de cette randonnée">
</iframe>
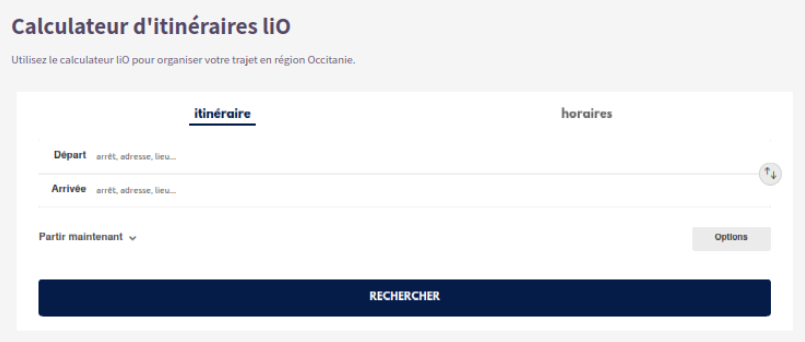
Sustainable transport route planner
Multiple widgets can be added to help citizens plan their trip using sustainable transports. Here is some examples but we advise you to look for local solutions, there is a good chance your country / state / city may have an existing widget that you can integrate on your website.
- SNCF Connect widget (train)
- Regional public transportation (Occitanie State)
- Regional public transportation (Auvergne Rhône Alpes state)
- CarSharing platforms (example with Blablacar)
Example with local public transportation route planner
Meteorology risk prevention
A lot of data could be added. Some widgets already exists, other could be created and could help users get information about :
- Fire hazard level (example in Quebec)
- Avalanche risks
- Flooding alerts
External scripts
You can inject additional scripts into your app by creating the following files:
customization/html/scriptsHeader.html: scripts injected in the<head>of the document.customization/html/scriptsFooter.html: scripts injected just before the</body>end tag.
The scripts templates are intended for third party scripts. Unlike the HTML parts, there is not possibility of translations.
Within each of these templates you need you can write one or more <script> tags.
The above example will be executed once the page is loaded and each time the browser is hard reloaded. Due to the application's dynamic router, the script will not be executed on a page change.
If you need to execute the script on every page change you need to attach an event listener.
<script>
  window.next.router.events.on("routeChangeComplete", function (url) {
    console.log(`hello ${url}`);
  });
</script>
Note
In Geotrek-rando prior to version 3.15.4, the window.next object is not yet loaded when scripts are run. You must therefore find a strategy to wait for it before attaching the event listener.
External JSON feed
Note
If you want to display articles from another website, you can do so using custom HTML templates.
Demo Screenshot
JSON Feed
To retrieve data from another website, the well-known feeds are RSS or Atom, but the best format for communicating remains JSON, so we decided to develop a script that uses them all: JSON Feed.
So, if you wish to copy/paste the following codes into your customization but with your own feed, it must be formatted in JSON Feed or you must edit the following script to adapt it.
Template
Common
Let's try the following code and copy it into a template file like customization/html/homeTop.html:
<div
  data-widget="feed"
  data-url="https://www.ecrins-parcnational.fr/flux_actus.json"
  data-limit="6"
  data-title="Découvrir les dernières actualités"
></div>
data-widget="feed" (mandatory): all HTML tags with this data attribute and the value “feed” will be parsed by the corresponding script.
- data-url (mandatory): this is the feed source. If left blank, nothing happens.
- data-limit (optional - default Infinity): is the number of elements to be displayed.
- data-title (optional): allows to add a title to the section
Internationalization
If the feed is only available in one language, we suggest you paste it only in the suffixed template: homeTop-en.html.
If you have feeds available in different languages, you can duplicate the template with the language code as a suffix as above, or you can use the {{ language }} variable.
Using the HTML example above, let's assume that JSON feeds are available via these urls https://www.ecrins-parcnational.fr/en/flux_actus.json for the English version and https://www.ecrins-parcnational.fr/fr/flux_actus.json for the French version. You can therefore only define homeTop.html with the following content:
<div
  data-widget="feed"
  data-url="https://www.ecrins-parcnational.fr/{{ language }}/flux_actus.json"
></div>
Widget in details page
It works in the same way.
You can create the file customization/html/details/feedWidget.html and paste the following template:
<div
  data-widget="feed"
  data-url="https://www.ecrins-parcnational.fr/flux_actus.json"
  data-limit="6"
></div>
feedWidget in the desired details page in customization/config/details.json.
{
  "sections": {
    "trek": [
      {
        "name": "feedWidget",
        "display": true,
        "anchor": true,
        "order": 200
      }
    ]
  }
}
The main difference with the common template is that you don't have to define the data-title attribute, as the title is automatically defined in translated files under the key details.[file-widget-name].
With our example, we need to add these lines in customization/translations/fr.json :
Script
All this won't work without the associated script. You can copy/paste the script below into customization/html/scriptsHeader.html:
<script type="module">
  async function getFeedContent(url) {
    const storageUrl = 'feedWidget:' + url;
    if (window[storageUrl]) {
      return window[storageUrl];
    }
    if (!url) return null;
    try {
      const feedContent = await fetch(url).then(response => response.json());
      window[storageUrl] = feedContent;
      return feedContent;
    } catch {
      return null;
    }
  }
  async function generateFeedTemplate(Widget) {
    const {
      dataset: { url, limit = 'Infinity', title },
    } = Widget;

    Widget.classList.add('empty:hidden');

    const rawfeed = await getFeedContent(url);

    if (!rawfeed) return;

    // JSONFeed format
    const feed = Array.isArray(rawfeed) ? rawfeed : rawfeed.items;

    if (feed.length === 0) return;

    const Title =
      title &&
      Object.assign(document.createElement('h3'), {
        className: 'mb-2 desktop:mb-6 text-H2 desktop:text-H2 font-bold',
        textContent: title,
      });

    const List = Object.assign(document.createElement('ul'), {
      className:
        'flex items-start gap-4 desktop:gap-6 overflow-x-auto overflow-y-hidden scroll-smooth snap-x pb-5 mt-4 mb-2',
    });
    feed.slice(0, limit).forEach(item => {
      const Item = Object.assign(document.createElement('li'), {
        className:
          'relative border border-solid border-greySoft rounded-lg flex-none mx-1 overflow-hidden hover:border-blackSemiTransparent transition duration-500 w-70',
      });
      const image = item.image ?? item.banner_image;
      const ItemImg =
        image &&
        Object.assign(document.createElement('img'), {
          loading: 'lazy',
          src: item.image ?? item.banner_image,
          className: 'overflow-hidden size-full object-cover object-center',
          alt: '',
        });
      const ItemContent = Object.assign(document.createElement('div'), {
        className: 'flex flex-col gap-2 p-4',
      });
      const ItemTitle = Object.assign(document.createElement('h4'), {
        className: 'text-xl',
      });
      const ItemLink = Object.assign(document.createElement('a'), {
        className:
          "text-primary1 hover:text-primary3 focus:text-primary3 before:content-[''] before:absolute before:inset-0",
        href: item.url,
        target: '_blank',
        rel: 'noopener noreferrer',
        textContent: item.title,
      });
      const date = new Intl.DateTimeFormat(document.documentElement.lang).format(
        new Date(item.date_published),
      );
      const summary = item.summary ?? item.content_text;
      let ItemSummary = summary
        ? Object.assign(document.createElement('p'), {
            className: 'line-clamp-2 desktop:line-clamp-5',
            textContent: date + ' - ' + (item.summary ?? item.content_text),
          })
        : Object.assign(document.createElement('div'), {
            className: 'content-WYSIWYG line-clamp-2 desktop:line-clamp-5',
            innerHTML: date + item.content_html,
          });

      ItemTitle.append(ItemLink);
      ItemContent.append(ItemTitle, ItemSummary);
      ItemImg && Item.append(ItemImg);
      Item.append(ItemContent);
      List.append(Item);
    });
    Title && Widget.append(Title);
    Widget.append(List);
  }

  function initFeedWidget() {
    window.setTimeout(() => {
      Array.from(document.querySelectorAll('[data-widget="feed"]'), generateFeedTemplate);
    }, 200);
  }

  // Wait for the load of next router
  const routeChange = setInterval(async function () {
    if (window.next && window.next.router) {
      window.next.router.events.on('routeChangeComplete', initFeedWidget);
      initFeedWidget();
      clearInterval(routeChange);
    }
  }, 100);
</script>
A few explanations about the script :
- The first action is to add a
classNameto the template in order to hide it if it is empty. - If there is no
data-urldefined, or if there is an error when retrieving the data, or if the data returns 0 elements, the script stops execution and nothing is displayed. - The source URL must provide a JSON feed format, otherwise it will try to loop inside as if the response were the contents of the
itemskey of the JSON feed. No other checks are made, so if your JSON is not properly formatted, errors may occur. - For the card content, it tries to get the value of
summary, if this key has no value, it tries the value ofcontent_text. And if this key also has no value, it finally tries withcontent_html. Be careful with the last property: you have to trust the source because it executes ainnerHTML.